Observable Macro in SwiftUI
Nov 27, 2023
At WWDC23, the @Observable macro was introduced with a clear mission: to simplifying the handling of observation-related code and improve the app's performance. In this article let's explore what it brings to the table and how to migrate from using ObservableObject protocol to the new Observation framework using Observable macro.
Observation framework
Beginning with iOS 17, iPadOS 17, macOS 14, tvOS 17, and watchOS 10, SwiftUI introduces support for the new Observation framework.
Capability
- Marking a type as observable
- Tracking changes within an instance of an observable type
- Observing and utilizing those changes elsewhere, such as in an app’s user interface
To declare a type as observable, attach the @Observable macro to the type declaration. This macro declares and implements conformance to the Observable protocol to the type at compile time.
Example:
@Observable
class ViewModel {
    var name = "John"
    var age = 30
}
To be able to use this new macro we need to import the new Observation module:
import Observation
But if you already import SwiftUI then there is no need since the Observation module is already included within SwiftUI. So import SwiftUI is enough:
import SwiftUI
In this example, both the name and age properties are automatically marked as observable without the need for individual annotations: @Published property wrapper just like the old way using ObservableObject protocol
Advantage
In this new pattern, a "observable" object can keep track of a list of Observers and inform them about any particular or general changes in its condition.
This approach has the benefit of preventing these objects from being directly interconnected and allows for the automatic spreading of updates to multiple potential viewers.
Let's SwiftUI handle and decide what should be update and re-render.
Adopting Observation provides your app with the following benefits:
- Tracking optionals and collections of objects, which isn’t possible when using ObservableObject.
- Using existing data flow primitives like State and Environment instead of object-based equivalents such as StateObject and EnvironmentObject.
- Updating views based on changes to the observable properties that a view’s body reads instead of any property changes that occur to an observable object, which can help improve your app’s performance.
With this new framework, developers can write and adapt observer design pattern easier than before. Less syntax, less confusion. Eliminate the need of manual adding the @Published property wrapper and the use of object-based types StateObject and EnvironmentObject.
Migrating Example
To have a better undertanding of this new framework, we will make a simple randomizer App using both the old and the new way.
First let's build it without using any of the above solution:
struct RandomNumberView: View {

    private let title: String = "Random Number"
    @State private var randomNumber: Int = 0

    var body: some View {
        VStack(spacing: 24) {
            Text(title)
                .font(.largeTitle)

            Text("$\(randomNumber)")
                .font(.title)
                .contentTransition(.numericText(value: Double(randomNumber)))

            Button("Randomize") {
                withAnimation(.bouncy) {
                    randomNumber = Int.random(in: 1..<1000)
                }
            }
        }
    }
}
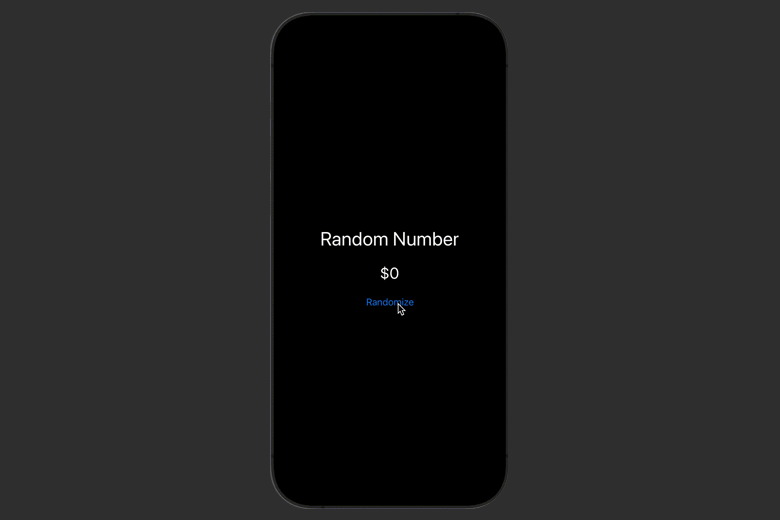
Result:

We have simple view with a VStack contains: a large title, a label to display our random number and a button to trigger randomize action. Whenever the randomNumber changes, we need to update and re-render our View with the new number. Therefore, we mark it with the @State property wrapper.
But this is not practical in real application. The logic should be seperated from the interface following modern design principal to make our app more scalable.
Let's extract our logic to the viewModel and named it RandomNumberViewModel.
Using ObservableObject protocol
class RandomNumberViewModel: ObservableObject {
    let title: String = "Random Number"
    @Published var randomNumber: Int = 0

    func randomize() {
        randomNumber = Int.random(in: 1..<1000)
    }
}
We create a new class and adapt to the ObservableObject protocol, then we move our properties and function into it. Because we need to update our view whenever the randomNumber change, so we will mark it with the @Published property wrapper.
Now let's update our View:
struct RandomNumberView: View {

    @StateObject private var viewModel = RandomNumberViewModel()

    var body: some View {
        VStack(spacing: 24) {
            Text(viewModel.title)
                .font(.largeTitle)

            Text("$\(viewModel.randomNumber)")
                .font(.title)
                .contentTransition(.numericText(value: Double(viewModel.randomNumber)))

            Button("Randomize") {
                withAnimation(.bouncy) {
                    viewModel.randomize()
                }
            }
        }
    }
}
Here we will use @StateObject to initialize our view model. And thus our App is now working again with the logical flows have been seperated from the interface, making it more scalable now.
Let's use the new Observation framework.
New Observable Macro
Start by refactoring with our view model:
@Observable
class RandomNumberViewModel {
    let title: String = "Random Number"
    var randomNumber: Int = 0

    func randomize() {
        randomNumber = Int.random(in: 1..<1000)
    }
}
We will use @Observable macro and with this we can eliminate all of the @Published property wrapper. Let SwiftUI decide when to update the views for us.
Our app is simple here, but if we are dealing with larger view model like this:
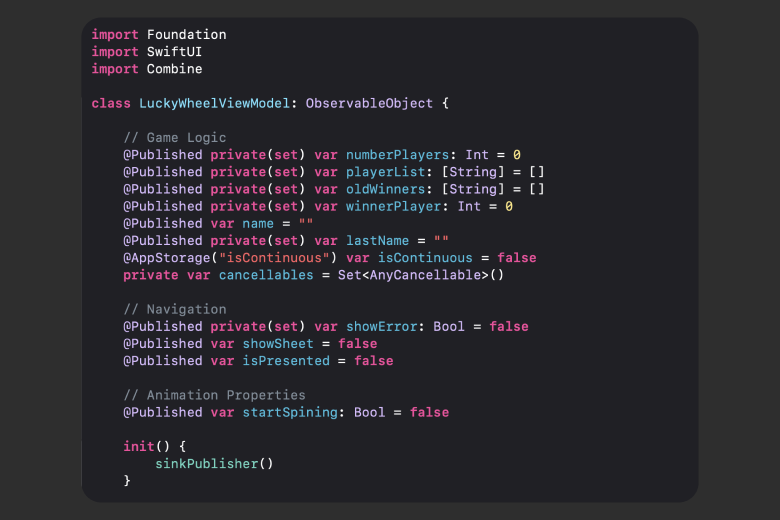
Then having a chance to skip all the @Published property wrappers is a bliss.
There are many benefits come from this. Firstly, it will be easier to read and write code because there is no need to specifically adding another syntax layer like before.
Furthermore, this will result in less potential bugs happened because we developers mistaken using this @Published property wrapper.
From now on SwiftUI will see and handle the process of update user interface for us when neccessary. This will then improve the app performance as well. If any of the other properties change in the same model object, no new re-rendering happens. Excellent!
Now let's update our View:
struct RandomNumberView: View {

    @State private var viewModel = RandomNumberViewModel()

    var body: some View {
        VStack(spacing: 24) {
            Text(viewModel.title)
                .font(.largeTitle)

            Text("$\(viewModel.randomNumber)")
                .font(.title)
                .contentTransition(.numericText(value: Double(viewModel.randomNumber)))

            Button("Randomize") {
                withAnimation(.bouncy) {
                    viewModel.randomize()
                }
            }
        }
    }
}
The difference here is that instead of using @StateObject, we just use @State like the begining solution. Less syntax, less confusion and our app is still working great with better performance:
Bindable
In SwiftUI, the new @Bindable property wrapper is used to create bindings for properties that are owned by Observable classes. It allows us to establish a connection between a value and a view that displays and changes it, similar to the @Binding property wrapper.
This will come in handy when we start extracting views into reusable components. In our example, let's extract the button to another view and called it ControlView.
Using ObservedObject property wrapper
The old solution will use the ObservedObject property wrapper:
struct ControlView: View {

    @ObservedObject var viewModel: RandomNumberViewModel

    var body: some View {
        VStack {
            Button("Randomize") {
                withAnimation(.bouncy) {
                    viewModel.randomize()
                }
            }
            .buttonStyle(.bordered)
        }
    }
}
It then observes changes in an external object which is our view model wrapped in the @StateObject initialized in the RandomNumberView. ObservedObject is typically used for data that is stored outside of the view and may change over time.
Going back to our RandomNumberView, we will replace the button with our custom component and comment the old code out:
ControlView(viewModel: viewModel)
// Replacing
//            Button("Randomize") {
//                withAnimation(.bouncy) {
//                    viewModel.randomize()
//                }
//            }
Everything is working fine and we now have a seperate component. Now let's do this using the new @Bindable property wrapper comes with the new Observation framework.
Bindable property wrapper
The @Bindable property wrapper enables us to create bindings to properties of Observable classes.
Though this allows us to share and manipulate the state of an Observable object across different views.
To use @Bindable, our class must conform to the Observable protocol, which we already did. Now let's make changes to our ControlView and it's quite simple:
struct ControlView: View {

    @Bindable var viewModel: RandomNumberViewModel

    var body: some View {
        VStack {
            Button("Randomize") {
                withAnimation(.bouncy) {
                    viewModel.randomize()
                }
            }
        }
    }
}
In the new Observation framework, @Bindable will go with State just like how @ObservedObject go with @StateObject in the old ObservableObject protocol.
Another imporant thing to note here is the difference between @Bindable and @Binding property wrapper:
- Both are used to create bindings in SwiftUI, but they serve different purposes.
- The
@Bindingproperty wrapper is used when you need a view to mutate data that is owned by another view. - On the other hand,
@Bindableallows you to create bindings for properties owned by Observable classes.
After wrapping our view model with @Bindable, we can create bindings from its properties. Inside our ControlView, let's add a Slider so that we can change to range of our random number.
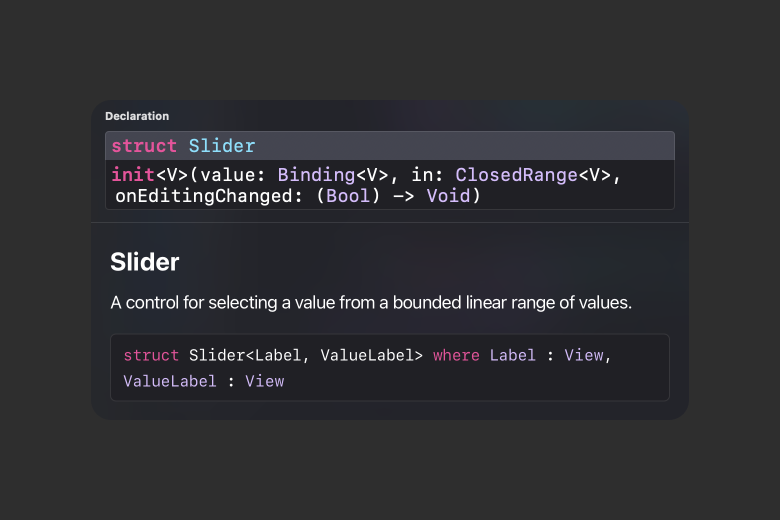
To learn more about `Slider `, checkout our article here.
The Slider will take a Bind value and a range of value to it, so let's define those in our view model:
@Observable
class RandomNumberViewModel {
    let title: String = "Random Number"
    var randomNumber: Int = 0

    // Slider properties
    var maxValueRandomTo: Double = 1000
    var maxSliderValue: Double = 1000

    func randomize() {
        randomNumber = Int.random(in: 0..<Int(maxValueRandomTo))
    }
}
We define 2 new properties: maxValueRandomTo which will the maximum input for our randomize() method. User can modifier this value using the Slider inside the range from 0 to maxSliderValue.
Now add the Slider to our ControlView:
struct ControlView: View {

    @Bindable var viewModel: RandomNumberViewModel

    var body: some View {
        VStack {
            Button("Randomize") {
                withAnimation(.bouncy) {
                    viewModel.randomize()
                }
            }

            Slider(
                value: $viewModel.maxValueRandomTo,
                in: 0...viewModel.maxSliderValue,
                onEditingChanged: { _ in }
            )

            Text("0 to \(Int(viewModel.maxValueRandomTo))")
                .font(.caption)
        }
        .padding(.horizontal)
    }
}
With the help of the new @Bindable property wrapper, we can now use the maxValueRandomTo from our view model as a Binding.
Result:

We now have a beautiful random machine using the new Observation framework and SwiftUI.
Environment shared Object
When our application grow and get complicated, it will have many different views and view models. There will be the case that one view depends on some view models from their outside parent layers.
In some cases, we may have to pass one view model through many layers and shared views. So what happens is that some views do not need reference for an object but their children do. Using @ObservedObject or @Bindable to passing objects here make our code becomes repetitive, duplicated and uncleaned.
Let's get back to our example, we extract the button and slider into 2 components for better explanation and reusability in the future.
CustomButton:
struct CustomButton: View {
    @Bindable var viewModel: RandomNumberViewModel
    var body: some View {
        Button("Randomize") {
            withAnimation(.bouncy) {
                viewModel.randomize()
            }
        }
    }
}
and CustomSlider:
struct CustomSlider: View {
    @Bindable var viewModel: RandomNumberViewModel
    var body: some View {
        VStack {
            Slider(
                value: $viewModel.maxValueRandomTo,
                in: 0...viewModel.maxSliderValue,
                onEditingChanged: { _ in

                }
            )

            Text("0 to \(Int(viewModel.maxValueRandomTo))")
                .font(.caption)
        }
    }
}
Now our ControlView will become shorter, cleaner:
struct ControlView: View {

    @Bindable var viewModel: RandomNumberViewModel

    var body: some View {
        VStack {
            CustomButton(viewModel: viewModel)
            CustomSlider(viewModel: viewModel)
        }
        .padding(.horizontal)
    }
}
A little bit better and it is very common for large SwiftUI application. But notice the ControlView has the reference to the view model but do not use it.
Previously in SwiftUI with the ObservableObject protocol, the EnvironmentObject is a way to share data across your SwiftUI views. It's a part of SwiftUI's declarative approach to building user interfaces.
With the new Observation framework in iOS 17, we have another alternative solution using the new environment(_:) view modifier.
Let's adapt it and make our code cleaner and better. It's very simple:
struct RandomNumberView: View {

    @State private var viewModel = RandomNumberViewModel()

    var body: some View {
        VStack(spacing: 24) {
            Text(viewModel.title)
                .font(.largeTitle)

            Text("$\(viewModel.randomNumber)")
                .font(.title)
                .contentTransition(.numericText(value: Double(viewModel.randomNumber)))

            ControlView(viewModel: viewModel)
                .environment(viewModel)
        }
    }
}
Using the environment(_:) view modifier to our ControlView, we have successfully inject our object to all of its child views. Now let's use it for our CustomButton:
struct CustomButton: View {

    @Environment(RandomNumberViewModel.self) var viewModel: RandomNumberViewModel

    var body: some View {
        Button("Randomize") {
            withAnimation(.bouncy) {
                viewModel.randomize()
            }
        }
    }
}
We now can use the @Environment property wrapper to get the reference of our view model just like other built-in environment values like colorScheme.
Let's do the same with the CustomSlider:
struct CustomSlider: View {

    @Environment(RandomNumberViewModel.self) var viewModel: RandomNumberViewModel

    var body: some View {
        VStack {
            Slider(
                value: $viewModel.maxValueRandomTo,
                in: 0...viewModel.maxSliderValue,
                onEditingChanged: { _ in

                }
            )

            Text("0 to \(Int(viewModel.maxValueRandomTo))")
                .font(.caption)
        }
    }
}
But this time we will receive an error:
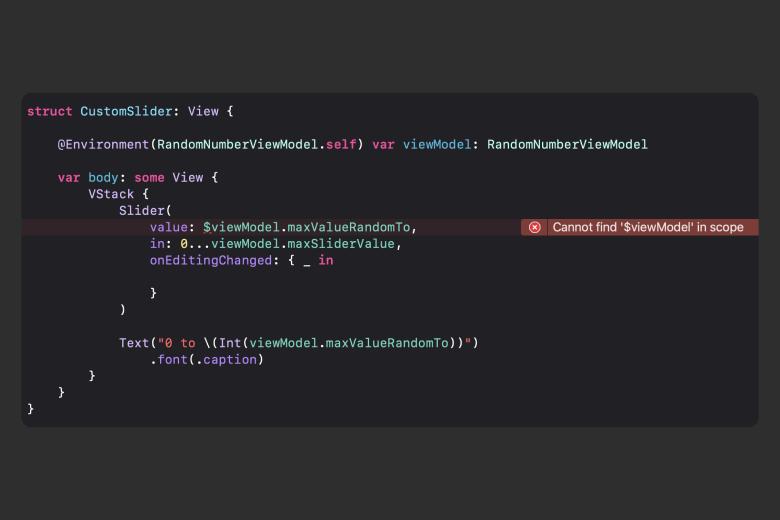
This is because our object is not Bindable, we just passing an object down but its properties are not binding yet. Which is why the Slider is yelling at us.
Lucky for us, we can use the @Bindable property wrapper on properties and variables to an Observable object. This includes global variables, properties that exists outside of SwiftUI types, or even local variables.
So let's create a local Bindable object and use it for the Slider:
struct CustomSlider: View {

    @Environment(RandomNumberViewModel.self) var viewModel: RandomNumberViewModel

    var body: some View {
        @Bindable var viewModel = viewModel
        VStack {
            Slider(
                value: $viewModel.maxValueRandomTo,
                in: 0...viewModel.maxSliderValue,
                onEditingChanged: { _ in

                }
            )

            Text("0 to \(Int(viewModel.maxValueRandomTo))")
                .font(.caption)
        }
    }
}
Now both the two components have had reference to the view model, we can remove the unnecessary reference from the ControlView :
struct ControlView: View {
    var body: some View {
        VStack {
            CustomButton()
            CustomSlider()
        }
        .padding(.horizontal)
    }
}
And in the RandomNumberView we do not need the view model parameter in its initialization anymore:
ControlView()
	.environment(viewModel)
Our code is now much better.
Conclusion
In this article, we have learn and get familar with the new Observation framework.
The benefits of it are:
- Easier to read and write code.
- Less syntax, less confusion, less potential bug.
- Improve app's performance.
Through an example of a randomizer App, we have used:
- The new
@Observablemacro to make our view model become observable. - Then we learned about the
@Bindableproperty wrapper to create bindings to properties of Observable classes. - Finally,
environment(_:)view modifier allow us the create a shared object between multiple views.
We have launched our new e-book "Cracking the iOS Interview" with Top 100 iOS Interview Questions & Answers. Our book has helped more than 394 iOS developers in successfully cracking their iOS Interviews.
Signup now to get notified about our
FREE iOS Workshops!
