Create immersive 3D Objects in visionOS app
Feb 02, 2024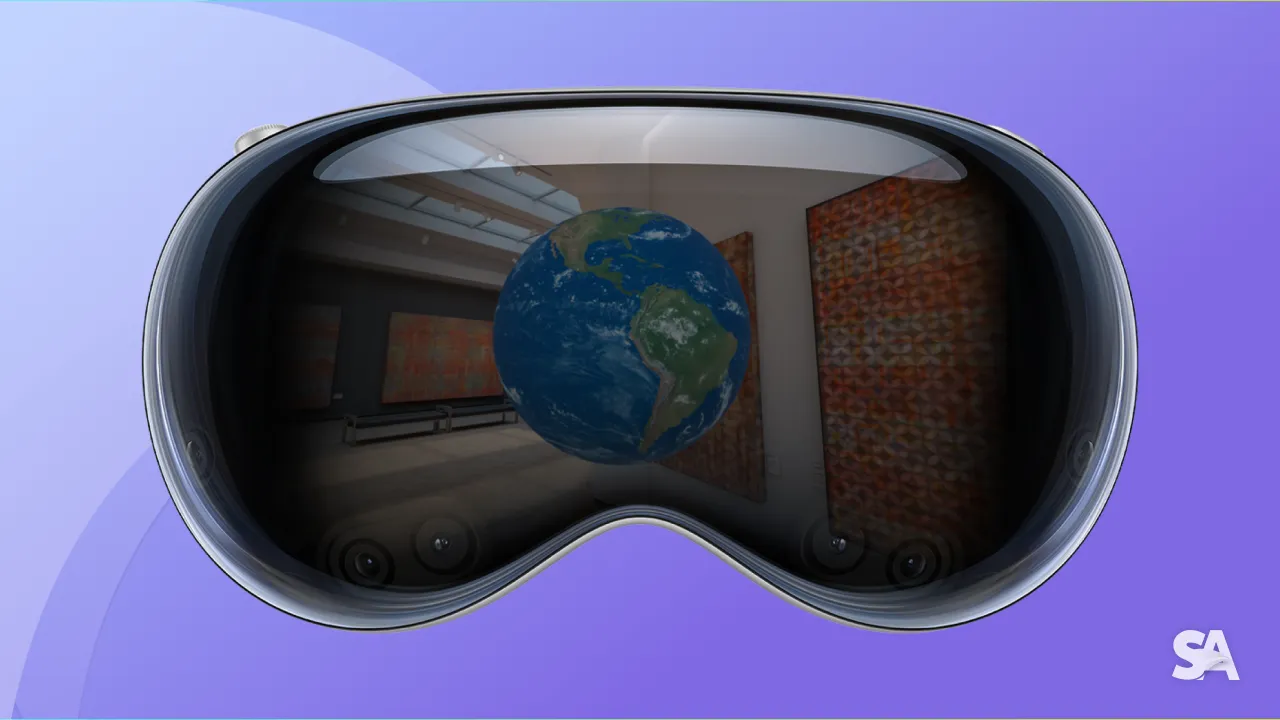
Since Virtual Reality and Augmented Reality technologies appeared, blending virtual 3D Objects into real-life environments has been the ultimate goal.
visionOS, a cutting-edge platform in the realm of digital visualization, introduces a transformative approach to presenting 3D objects with unparalleled clarity and detail.

Source: Apple
Presenting 3D Object
Open up Xcode and create a new Vision project. Select Volume for the Initial Scene.

If you are completely new to VisionOS, we highly suggest you first read our article "Exploring visionOS app development with SwiftUI" where we give an introduction to foundation concepts for this platform.
This will be the starting code that Apple gives us:

Which will nicely present a 3D Sphere using the new component RealityView. This is a very powerful SwiftUI view that allows embedded native RealityKit APIs.
However, there is a much simpler, lighter, and performance optimization to present a 3D Object: Model3D. We will learn about it in this article and deep dive to the RealityView in the next article.
USDZ Files
A USDZ file is a 3D file format that was developed by Pixar and further collaborated on with Apple. It stands for Universal Scene Description (USD) in a Zero-compression (Z) format.
USDZ supports a variety of digital content, including 3D graphics and animations. It's a compact, single-file format, which makes it easy to share and use. One of the key features of USDZ is that it can be viewed in AR on Apple devices without requiring any additional software or apps.
If you already developed an AR app using ARKit, then this is familiar to you.
There are 4 main ways for us as developers to get USDZ files:
- Built-in assets: Apple provides us with a variety of
USDZassets just like withSFSymbols. Open it in the new Reality Composer Pro:
- Buy on the marketplace/designer and import to our project. The most famous one is https://sketchfab.com/.
- Convert from another 3D file format with tools. Apple also provide the converter here: Convert Tool
- Use
Object Capture: is a technology introduced by Apple that allows users to create photorealistic 3D models of real-world objects using photographs taken from various angles.
For this example, we will import the Earth_Night.usdz USDZ assets and you can easily find it in our repo.

Now let's bring our Earth to the real environment.
Presenting USDZ object using Model3D
Model3D is a new SwiftUI view that is used to embed a 3D model from a USDZ file or Reality file in our SwiftUI app.
    Model3D(named: "Earth_Night") { model in
        model
            .resizable()
            .aspectRatio(contentMode: .fit)
    } placeholder: {
        ProgressView()
    }
Result:

Beautiful! Utilize the resizable(:) modifier for scaling the model proportionally within the existing view. Following this, apply the aspectRatio(:contentMode:) view modifier, which ensures the model retains its original aspect ratio during resizing.
There is also the convenient placeholder closure to handle asynchronous loading. This comes in handy when we need to load the model from the URL. SwiftUI has a native option for us too:
    let url = URL(string: "gs://fir-cloudmess-2a772.appspot.com/Earth.usdz")!
    Model3D(url: url) { model in
        model.resizable()
    } placeholder: {
        ProgressView()
    }
Result:

Awesome!
There is an important difference between Window and Volume is their size when users move:
- Window's size will scale based on distance. This ensures a great User experience for the content displayment. The content scales up and down so that users can always feel the same.
- Volume's size will remain the same size. This ensures the real size of the object and enhances the immersion experience.
Now let's take a quick tour of the controller of the VisionPro simulator:
From left to right:
- The mouse symbol represents user interaction. Selecting it and right-click on interactable components.
- The next symbol is a movement with us viewers as center anchors.
- The four arrows symbol is for moving in the current vertical space in four directions.
- The next globe symbol is still for moving but the anchor will be what we point at. The magnifying symbol is the zoom-in zoom-out feature.
- You can change the display environment with the camera symbol
Present Multiple 3D Objects
Now let's present our Earth day and night side by side like this:

In the last article, we saw how to present multiple windows using the .openWindow environment key. It's the same here. Inside our App, initialize another WindowGroup with the id "EarthNight":
WindowGroup {
    EarthView()
}
.windowStyle(.volumetric)
.defaultSize(width: 1, height: 1, depth: 1, in: .meters)

WindowGroup(id: "EarthNight") {
    EarthNightView()
}
.windowStyle(.volumetric)
.defaultSize(width: 1, height: 1, depth: 1, in: .meters)
Now we can present another Volumetric Object using openWindow(id: "EarthNight"):
struct EarthView: View {
    @Environment(\.openWindow) var openWindow
    @Environment(\.supportsMultipleWindows) private var supportsMultipleWindows

    var body: some View {
        Model3D(named: "Earth") { model in
            model
                .resizable()
                .aspectRatio(contentMode: .fit)
        } placeholder: {
            ProgressView()
        }
        .overlay(alignment: .bottom) {
            Button(action: {
                openWindow(id: "EarthNight")
            }, label: {
                Text("Open Volume")
            })
            .padding().glassBackgroundEffect()
        }
    }
}
Result:

To dismiss a Volume object, we use dismissWindow environment key:
struct EarthNightView: View {
    @Environment(\.dismissWindow) var dismissWindow

    var body: some View {
        Model3D(named: "Earth_Night") { model in
            model
                .resizable()
                .aspectRatio(contentMode: .fit)
        } placeholder: {
            ProgressView()
        }
        .overlay(alignment: .bottom) {
            Button(action: {
                dismissWindow(id: "EarthNight")
            }, label: {
                Text("Close Volume")
            })
            .padding().glassBackgroundEffect()
        }
    }
}
It's just a SwiftUI View
Model3D, as a SwiftUI view, offers numerous advantages, particularly in its seamless integration within the SwiftUI framework.
This integration not only simplifies the process of incorporating 3D models into iOS and macOS applications but also ensures consistency and efficiency in UI development.
Furthermore, Model3D benefits from SwiftUI's declarative syntax and reactive state management, allowing for dynamic and interactive 3D content that responds intuitively to user inputs and app state changes.
SwiftUI: learn once, apply everywhere!
Conclusion
In summary, Model3D in SwiftUI provides a streamlined and effective way to integrate 3D objects into iOS and macOS apps. Its support for the USDZ file format allows for high-quality, interactive 3D models, enhancing user experience.
But we do not stop there, in the next article we will learn how to interact with these virtual 3D objects by leveraging the power of RealityKit and the new ReailtyView.
We have launched our new e-book "Cracking the iOS Interview" with Top 100 iOS Interview Questions & Answers. Our book has helped more than 517 iOS developers in successfully cracking their iOS Interviews.
Signup now to get notified about our
FREE iOS Workshops!
