Exploring visionOS app development with SwiftUI
Jan 31, 2024
Welcome to the new world of Spatial Computing with visionOS. In this article, we will get familiar with the basic concepts of Spatial Computing and see how SwiftUI native components are used to build beautiful immersive experiences. Let's get started.
Window, Volume and Space
Apple Vision Pro introduces a boundless spatial platform for discovery, experimentation, and enjoyment, enabling the complete reimagining of your 3D experience. Users have the flexibility to engage with your application while remaining aware of their environment, or they can delve entirely into a universe crafted by you.
Your creations can seamlessly transition: initiate in a windowed mode, introduce 3D volumetric elements, shift to an all-encompassing immersive environment, and return effortlessly.
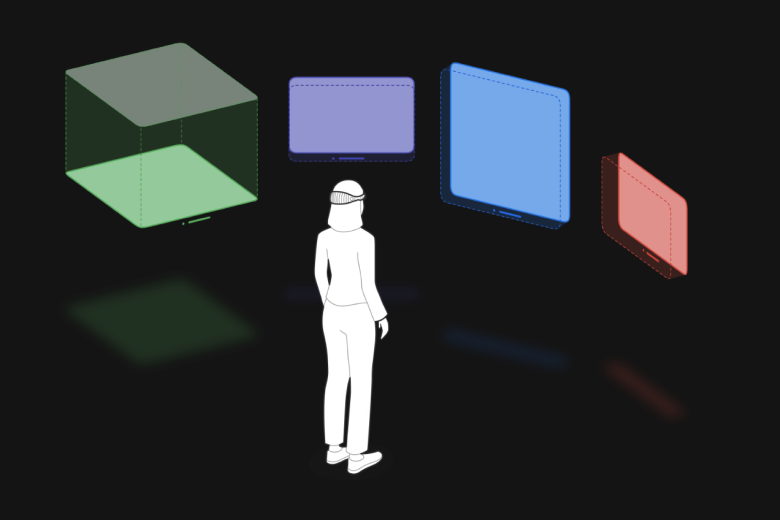
Source: Apple
There are 3 foundation concepts for this new OS:
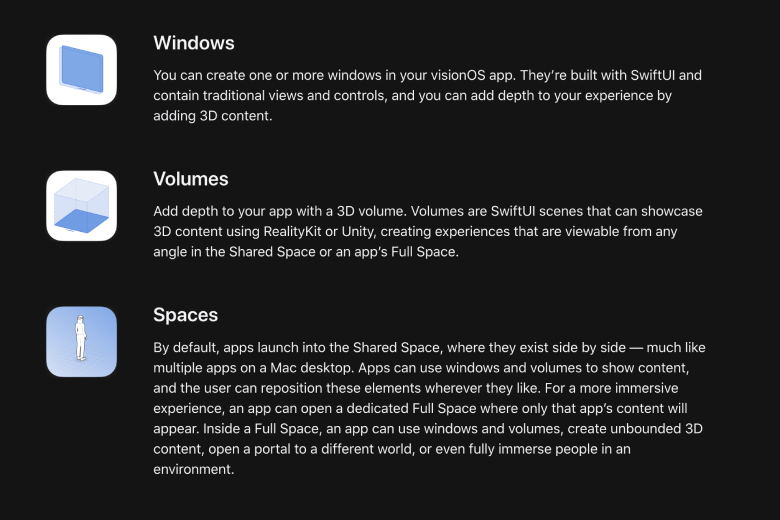
Source: Apple
Within our applications, we can use Window to present 2D Canvas or Volume to display 3-dimensional objects. We can display as many Windows or Volumes as we like.
Space refers to the surrounding environment when users are wearing the Vision device. Developers can configure and transition between 3 styles: mixed, full, and progressive.
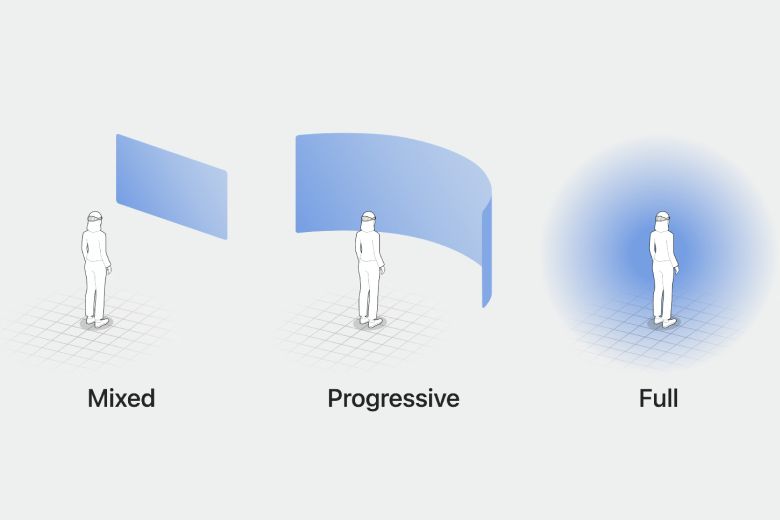
Source: Apple
- With
mixed immersion, our space's content coexists with the real world, which makes it great for lightweight experiences and augmenting people's surroundings. - With
full immersion, our app can become fully immersive and hide people's surroundings, transporting them into stunning new worlds. - And with
progressive immersionis a great middle-ground for experiences that keep people grounded in the real world in their periphery. With progressive immersion, people can also use the Digital Crown on the device to dial in exactly how much immersion feels right to them.
Understanding these concepts is crucial for making great immersive Spatial Computing experiences.
The possibilities are endless, let's begin with the fundamental elements of spatial computing provided by visionOS which is Windows and mixed immersion style. We will discover the remaining ones in later articles.
TabBar and Navigation
TabBar and NavigationController are 2 foundation containers in many modern applications. Let's learn how to implement them.
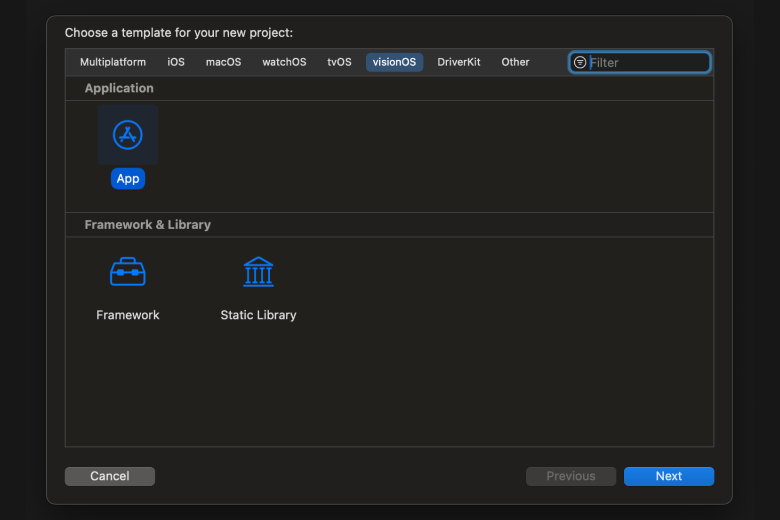
Open up Xcode and choose visionOS to make our first Spatial Computing application:
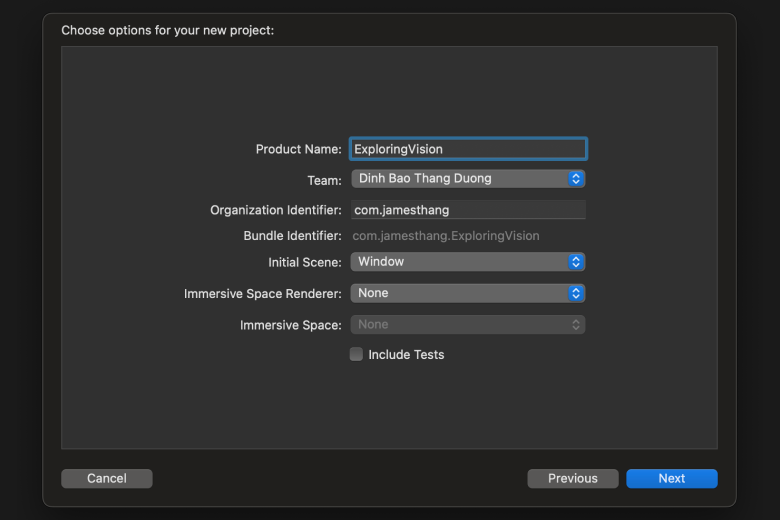
For Initial Scene, choose Window and set Immersive Space Rendering to None
The great part is that every native SwiftUI component will integrate seamlessly with this new OS. Build once, use everywhere!
TabView {
    HomeView()
        .tabItem {
            Label("Home", systemImage: "house")
        }

    SearchView()
        .tabItem {
            Label("Search", systemImage: "magnifyingglass")
        }

    SettingsView()
        .tabItem {
            Label("Settings", systemImage: "gear")
        }
}
Result:
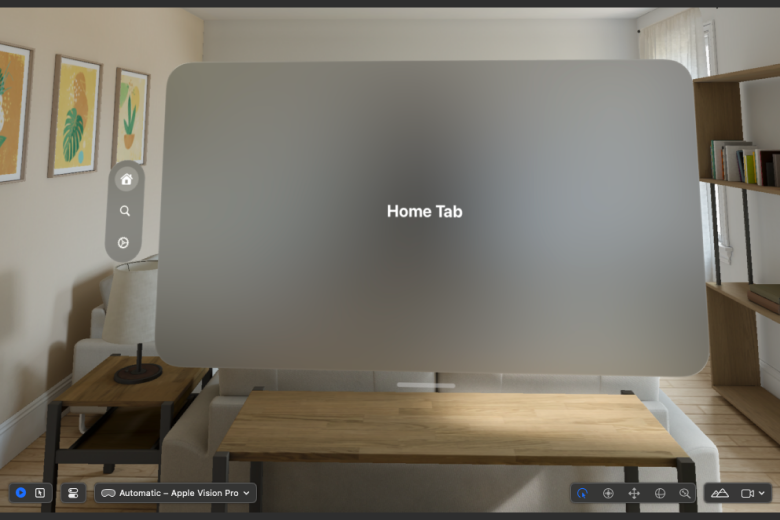
The TabBar will be placed sideways on this platform and by looking at it there will be more information and a hover effect indicating it's selectable:
There are different ways of interaction in this new platform: custom hand gestures, reaching out and touching it, or external devices (keyboard, mouse, or controller).
Now let's see how navigation behaves. In SwiftUI, NavigationStack is the way to go:
struct HomeView: View {
    var body: some View {
        NavigationStack {
            VStack {
                Text("Home Tab")
                    .font(.largeTitle)
                NavigationLink("Go to Detail", value: "HomeDetail")
                    .navigationDestination(for: String.self) { identifier in
                        if identifier == "HomeDetail" {
                            Text("Home Detail View")
                        }
                    }
            }
        }
    }
}
Looking beautiful and so far we do not need any new knowledge to build yet, all is the already established components in SwiftUI
Checkout the Github project now!
Menus
Next, let's see how we can leverage SwiftUI to add more functionality to our applications.
struct HomeView: View {
    var body: some View {
        NavigationStack {
            VStack {
                Text("Home Tab")
                    .font(.largeTitle)
                NavigationLink("Go to Detail", value: "HomeDetail")
                    .navigationDestination(for: String.self) { identifier in
                        if identifier == "HomeDetail" {
                            Text("Home Detail View")
                        }
                    }
            }
            .toolbar {
                ToolbarItem(placement: .navigationBarTrailing) {
                    Menu {
                        Button("Option 1") { print("Home Option 1") }
                        Button("Option 2") { print("Home Option 2") }
                        Button("Option 3") { print("Home Option 3") }
                    } label: {
                        Label("Menu", systemImage: "ellipsis.circle")
                    }
                }
            }
        }
    }
}

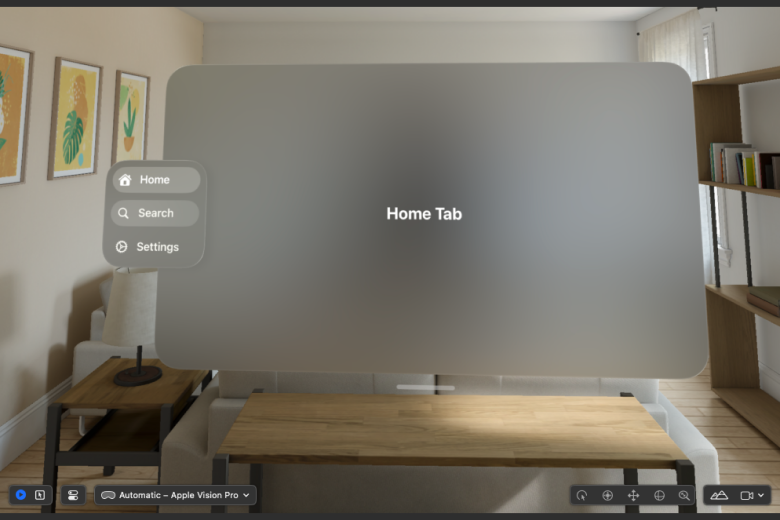
Again same old APIs using the navigation toolbar combined with the Menu, we can add rich features and functionalities to it and still achieve great user experience.
Ornaments
Take a look back at the TabBar, you will see that it is a floating panel with depth and abstraction. Apple has a new term for this called ornaments.
An ornament is positioned in a plane parallel to its corresponding window and marginally ahead on the z-axis. Should the window shift, the ornament follows, preserving its relative placement; even if the window's content scrolls, the ornament's controls or details stay static.
Ornaments can be placed along any edge of a window and may include user interface elements such as buttons, segmented controls, and various views.
The system employs ornaments for generating and handling components like toolbars, tab bars, and video playback controls, allowing us to utilize an ornament for crafting a bespoke component.
But we can make our custom ornaments too using the new .ornament(_) modifier:
TabView {
    HomeView()
        .tabItem {
            Label("Home", systemImage: "house")
        }

    SearchView()
        .tabItem {
            Label("Search", systemImage: "magnifyingglass")
        }

    SettingsView()
        .tabItem {
            Label("Settings", systemImage: "gear")
        }
}
.ornament(
    visibility: .visible,
    attachmentAnchor: .scene(.bottom),
    contentAlignment: .bottom) {
        Text("Ornament Content")
            .padding()
            .glassBackgroundEffect(
                in: RoundedRectangle(
                    cornerRadius: 32,
                    style: .continuous
                )
            )
    }
Adding the new custom ornament to our application:
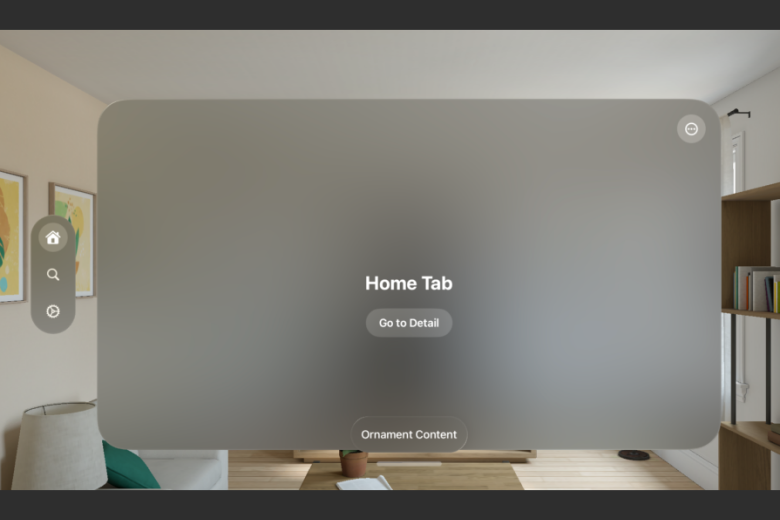
You can customize its position with the attachmentAnchor and contentAlignment.
Presenting multiple Views
Now let's attack the next common situation: present multiple scenes. We have seen how it behaves using NavigationStack with SwiftUI. The great news is the implementation for this new platform will be the same:
struct SearchView: View {
    @State var showSheet = false
    @State var showSecondSheet = false

    var body: some View {
        VStack {
            Text("Search Tab")
                .font(.largeTitle)

            Button {
                showSheet.toggle()
            } label: {
                Text("Present Sheet")
            }
        }
        .sheet(isPresented: $showSheet) {
            VStack {
                Button {
                    showSecondSheet.toggle()
                } label: {
                    Text("Present Another Sheet")
                }

                Button {
                    showSheet.toggle()
                } label: {
                    Text("Close Sheet")
                }
            }
            .padding(50)
            .sheet(isPresented: $showSecondSheet) {
                VStack {
                    Text("Sheet Number 2")

                    Button {
                        showSecondSheet.toggle()
                    } label: {
                        Text("Close Sheet")
                    }
                }
                .padding(50)
            }
        }
    }
}
Here we are using .sheet(_) modifier and achieved a beautiful 3-dimensional presentation. You can the the back view getting pushed back:
Though it looks great presenting multiple views, but can we present another Window? Not just a simple floating ornament, but the true Window. The answer is yes, let's see how it's done.
Checkout the Github project now!
Presenting multiple Windows
There are multiple steps to achieve this. The First step is that we must register each new Window beside our first default one with a unique ID.
Create a new WindowGroup with custom id "new-window" and attach our new Window to it:
@main
struct ExploringVisionApp: App {
    var body: some Scene {
        WindowGroup {
            ContentView()
        }

        WindowGroup(id: "new-window") {
            NewWindowView()
        }
    }
}
Here is our new window which contain the default Hello World model and with a new dismiss button:
struct NewWindowView: View {
    @Environment(\.dismissWindow) private var dismissWindow
    var body: some View {
        VStack {
            Model3D(named: "Scene", bundle: realityKitContentBundle)
                .padding(.bottom, 50)

            Text("Hello, world!")

            Button("Done") {
                dismissWindow(id: "new-window")
            }
        }
        .padding()
    }
}
Now there are 2 new environment properties to present and dismiss a Window: openWindow and dismissWindow. Both receive an ID and it must match the ID we specify when declare our new WindowGroup.
Back to our ornament, let's modify it to an Button with an action to open our new window:
struct ContentView: View {

    @Environment(\.openWindow) var openWindow
    @Environment(\.supportsMultipleWindows) private var supportsMultipleWindows

    var body: some View {
        TabView {
            HomeView()
                .tabItem {
                    Label("Home", systemImage: "house")
                }

            SearchView()
                .tabItem {
                    Label("Search", systemImage: "magnifyingglass")
                }

            SettingsView()
                .tabItem {
                    Label("Settings", systemImage: "gear")
                }
        }
        .ornament(
            visibility: .visible,
            attachmentAnchor: .scene(.bottom),
            contentAlignment: .bottom) {
                Button {
                    print("Open New Window")
                    openWindow(id: "new-window")
                } label: {
                    Text("Open New Window")
                        .padding()
                }
                .glassBackgroundEffect(
                    in: RoundedRectangle(
                        cornerRadius: 32,
                        style: .continuous
                    )
                )
                .opacity(supportsMultipleWindows ? 1 : 0)
            }
    }
}
Result:
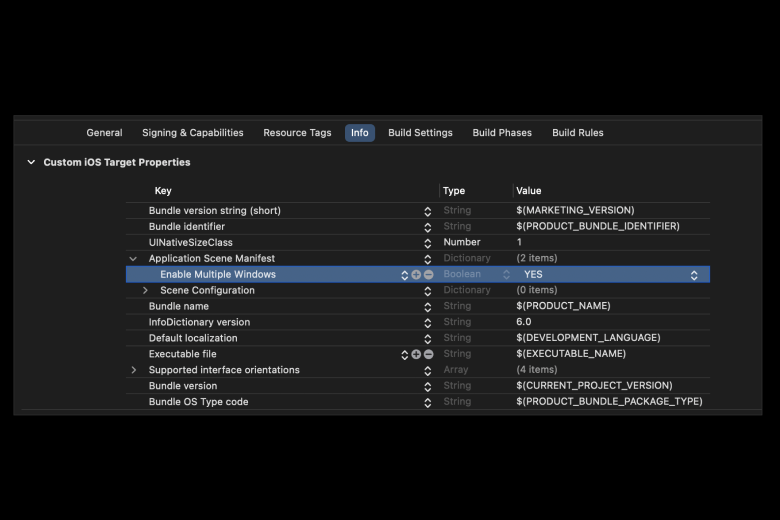
Great. You may notice we are using another environment property here: supportsMultipleWindows. This will return the Boolean indicating that our application can support multiple windows.
To support that we need to configure it in our Info.plist file:
Checkout the Github project now!
Congratulations! You deserve to celebrate this moment. Today you learned about the foundation concepts of visionOS: Window, Volume, and Space. You also got deeper understanding of Window and learnt how seamlessly all the native SwiftUI APIs can help to build feature-rich applications. We encourage you to read more related articles like Create immersive 3D Objects in visionOS app.
We have launched our new e-book "Cracking the iOS Interview" with Top 100 iOS Interview Questions & Answers. Our book has helped more than 517 iOS developers in successfully cracking their iOS Interviews.
Signup now to get notified about our
FREE iOS Workshops!
