Sheets In SwiftUI
Sep 27, 2022
Sheets are used extensively in SwiftUI for presenting views. If this were UIKit, you would use a command like self.present(ViewController(), animated: true) but in SwiftUI, we use a view modifier command. For sheets, they are not a lot of parameters you could play around with. We are going to explore the two commands that you are most likely to encounter in practical development today. So without further ado, let's dive in.
Basic Implementation
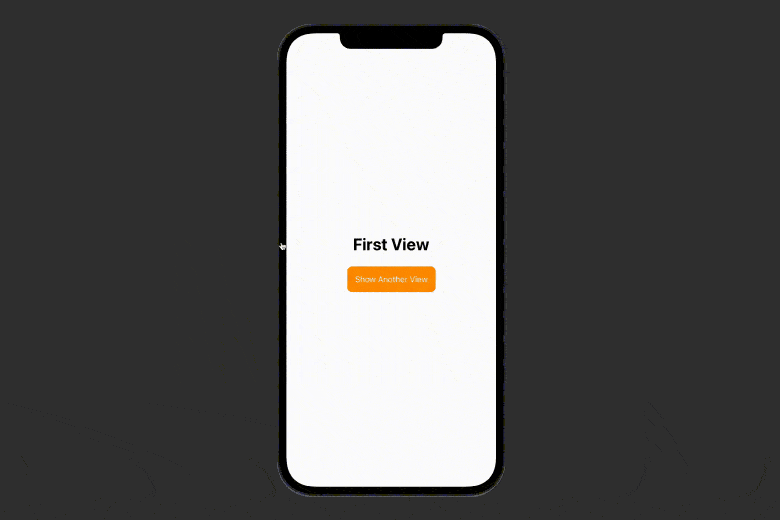
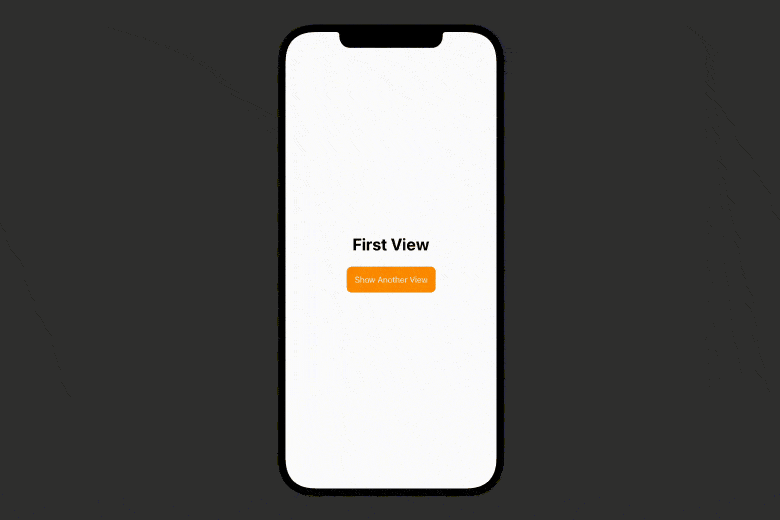
All you need to implement a sheet is a state variable representing the presentation state and two views, the presenting view and the presented view.
struct FirstView: View {
 //1
    @State var presentAnotherView = false
    var body: some View {
        VStack {

	  //2
          Text("First View")
                .bold()
                .font(.largeTitle)

	 //3
            Button {
                self.presentAnotherView = true
            } label: {
                Text("Show Another View")
                    .padding()
                    .background(Color.orange)
                    .cornerRadius(10)
                    .foregroundColor(Color.white)

            }
	//4
        }
        .sheet(isPresented: $presentAnotherView) {
            AnotherView()
        }
    }
}
//5
struct AnotherView : View {
    var body: some View {
        Text("Second View")
            .bold()
            .font(.largeTitle)
    }
}
Result:
Code Explanation:
- Here is the state boolean variable that one is going to toggle when you intend to present the view.
- Some bold text with large titles which say it's the first view.
- A button, which, on click, turns
presentAnotherViewas true. For the appearance, you can see that the button has an orange background, some corner radius and a foreground color of white over some padding. - This is the key part. The sheet has a binding bool of
presentAnotherViewand the content of the sheet isAnotherView().
Pretty easy to implement, right?
Presenting on change of the object value
In this part of the article, you are going to learn about how to present a sheet on change of an object value. Now, you ask, why do we need something like this when we already present sheets with a boolean value. The reason behind it is that apps with complex networking functions need it. What if you have functionality in your app where you download some data and you want to present a view showing more information about it? That is when a sheet with this parameter will be helpful. Apart from that, you can also use this to pass data to the sheet.
So, for implementing this type of sheet, you need an identifiable object. Now you maybe curious, what are identifiable objects? According to apple, these are:
Classes of types whose instances hold the value of an entity with stable identity
Which, in the practical world, means we need to have an id property in your object, most probably set to some kind of UUID. UUIDs are basically unique ids consisting of characters and numbers. Now that you know about that, let's make a basic identifiable struct called Object which has an id (of course, since it's an identifiable object) and a title.
struct Object : Identifiable {
    var id = UUID()
    var title : String
}
struct FirstView: View {
@State var presentAnotherView = false
@State var object : Object!
var body: some View {
VStack {
Text("First View")
.bold()
.font(.largeTitle)
Button {
//1
self.object = Object(id: UUID(), title: "Some data from first view")
} label: {
Text("Show Another View")
.padding()
.background(Color.orange)
.cornerRadius(10)
.foregroundColor(Color.white)
}
}
.sheet(item: $object) { item in // 2
AnotherView(object: item)
}
}
}
Code Explanation:
- When the button is clicked, you change the object value to an object id as UUID() and some text for the title. Note here that is the title you are going to present in another view.
- Usage of sheet with different parameter - one with binding object and another view with an extra parameter. (talked about in more detail later)
That was all about the first view. Let's make some changes in the AnotherView too so the data passed down from the FirstView is reflected here.
struct AnotherView : View {
//1
    @State var object: Object!
    var body: some View {
        VStack(spacing: 20) {
//2
        Text("Second View")
            .bold()
            .font(.largeTitle)
  //3
            if let object = object {
                Text("Message from first view: \n \n ").fontWeight(.medium) + Text(object.title).fontWeight(.thin)
            }
        }
            .padding()
    }
}
In the above code, we did some changes compared to the last section.
- You have this optional object parameter which you use to pass down information from other views.
- Some bold large text.
- Here, firstly, there is the use of
if let(really helpful while dealing with optional values). You can see the use of text concatenation for showing the object title the view received from other views.
This is the final result:
Woohoo, you can see how you're able to pass the data and present the view on the change of the second screen.
Summarising the whole article, you learned about showing a sheet by toggling the bool value and showing it by changing the value of an object.
Signup now to get notified about our
FREE iOS Workshops!
